To make superlative loaf breads, flat breads and pizzas, here's the foundation:
1 & 1/2 cups water
1/2 cup starter
1 &1/2 t salt
Flour to stir in. Nothing to knead? Of course not. Why bother?
Yield: .5 kilo loaf or multiple pizzas
Factoid: A slack dough makes better bread.
Monday, December 29, 2008
Sunday, December 28, 2008
Beauty and the Beast
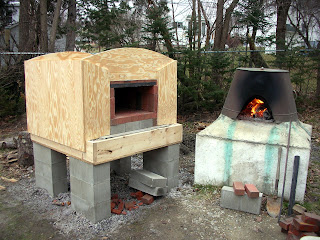
 When contemplating constructing an outdoor bake oven, the most important thing to ask yourself is what the oven will be used for.
If you are going to just be baking pizza and flat breads, you could construct a sleek beauty with little or no insulation and the oven would have a small appetite for wood consumption.
However, if you have serious thoughts about baking multiply loaf breads with multiple bakes from a single firing, then you want to construct a beast. It will be beastly in that you'll need lots of mass for heat retention and lots of insulation to keep the heat from finding its way to China. The beast will require about 8" of mass and about 8" of insulation, and it will have a beastly appetite to consume wood.
A compromise oven might be one with 4" of mass and 4" of insulation. This oven would work for flat breads and you should be able to get one bake of loaf breads before you needed to refire.
The beast can be a beauty, but the beauty cannot be a beast.
Saturday, December 27, 2008
Searching For The Grail
 Bread Undercover
As much as I love baking in my outdoor wood-fired ovens, I have to say that if you're searching for the perfect loaf, then you might find it much easier (although not as much fun) to bake in a conventional oven. In this type of oven, you have much more control of the bake.
The bread in the photo was baked "Undercover."
 The oven setup includes 4 quarry tiles and a homemade cloche.
Sunday, December 21, 2008
Breadhunter's Brick Oven

It's a wild day of swirling snow, biting wind, and very low temperatures, but I summoned up the courage to go outside and take a picture.
I have stripped away all the wood and insulation except for the base. The oven should bake flat-breads and pizzas without a problem. Probably I'll insulate with Perlite.
Wednesday, December 17, 2008
Breadhunter's Brick Oven
Tomorrow I will dismantle the oven. Too much wood too close to flame. Bad idea. But the bread was good.
Tuesday, December 16, 2008


Monday, December 15, 2008
Breadhunter's Brick Oven
 Today it warmed up enough for me to paint, but I was taking no chances. The Vidal Sassoon hair dryer came in handy to warm the surface.
 A heat shield was constructed from sheet metal, and the next major step will be to fashion a door and fire up the oven.
 Yes, I know, the oven does suggest a large, elevated dog house.
Sunday, December 14, 2008
Breadhunter's Brick Oven
 Facade possibilities
 Burn test
Friday, December 12, 2008
Breadhunter's Brick Oven
 It was a Maine morning of slush, ice, snow and general glop, but there was work to do.
 After the tarps were pulled off, I insulated the oven with cellulose and then covered the top with a spiffy metal roof.
 Where there are some small gaps and imperfections in the oven facade, these will be filled with bread dough. I did say this oven would not need mortar or mud, but I didn't say anything about dough.
There is still work to be done on the tongue, a door must be constructed, as well as a heat shield and something has to be done about the nude plywood. Maybe cedar shingles or simply paint.
Thursday, December 11, 2008
Breadhunter's Brick Oven
After asking my friend Chuck lakin for an "oven consultation," not only did he come over to consult, but offered to cut my plywood in his shop. What could I say? Normally, I simply cut plywood with my skill saw, but it's a lot easier and more accurate with a table saw.
 Chuck with the cordless drill
My initial reaction so far is that maybe the structure is too monolithic, but to get lots of mass and insulation really does take some space. When the oven is complete, I think it will look a lot better.
 What's next? Now I can fill the cavity between the masonry and plywood with cellulose insulation and cover the top with a metal roof. After that, I'll constrict the size of the oven opening, create an overhanging tongue and do something about the dreadful, naked plywood look.
Wednesday, December 10, 2008
Bread Hunter's Brick Oven

It's a rainy day in Maine and the little snow we had is gone. Now I have some time to contemplate my next move. There is a danger that my new oven will be too monolithic for my taste, but I really won't know until it's done.
I don't know how we live with those ubiquitous blue tarps. Although I hate them, I continue to buy them. They don't seem to do anything right. In fact they leak. Some of my cellulose is now damp.
Has anyone done a documentary film on the manufacture of blue tarps, health ramifications of the workers from breathing molten plastic fumes and the tarps environmental impact?
Tuesday, December 9, 2008
Breadhunter's Brick Oven
 The oven interior (all brick) is done. Now I have to decide if I want to square off the outer "heat sink." That would mean adding more brick, but maybe enough is enough. I think I've already used about 100 bricks.
The next major issue is to design and build a wooden shell to enclose the exterior of the oven, but with enough room on the sides and top to contain the insulation.
Monday, December 8, 2008
Breadhunter's Brick Oven
 Disassemble
 Tonight I will ponder the sleight sidewall height differential regarding the brick and solid block, and then on to the oven roof.
 The Matrix
 End Of Day
Sunday, December 7, 2008
Breadhunter's Brick Oven

Last night it snowed a little and today there were flurries. To keep warm while working, I fired up the earth oven. Getting all the new oven elements to fit together without mortar really takes some playing around, but it is possible. My big concern is getting the cellulose to not squish very much under the weight of the oven. I might have to add another joist in the box, and this is just what I'll be thinking about tonight.
Saturday, December 6, 2008
breadhunter's Brick Oven

Real visible progress today. The box has been filled with cellulose insulation, cement board on top of that and then a layer of solid block. The next stage will be to lay the brick hearth/floor.
No matter how much measuring and planning you do, you can be certain you'll be making adjustments as you go along. Just as a 2x4 does not really measure 2x4, a solid 4x8x16 block does not measure 4x8x16. Those are nominal measurements, not actual measurements. You can expect your oven to be a little bigger or smaller than what you expected, unless you apply engineering exactitude, but that type of precision does not interest Breadhunter.
Wednesday, December 3, 2008
Breadhunter's Brick Oven

Getting the four towers to line up properly really took a certain amount of hair pulling. Things would have gone faster and better had I relied on my eyes more than on levels and tape measures. In addition, had I positioned the towers on a concrete slab, I probably could have had everything lined up in 15 minutes, but I'm determined to not mix cement or mud for this project. So, I probably spent an hour getting the towers right.
Next, a box was constructed, and it will sit on the towers. Insulation will go in the box, and then the oven will go up. I've decided to use cellulose insulation because it's a recyclable material (looks like old newspapers to me), has a high R value and it's cheap. I've never heard of it being used in this type of application, so we shall see.

Tuesday, December 2, 2008
Breadhunter's New Brick Oven

Today I smoothed out the crushed rock and positioned the concrete block. Tomorrow I'll level the block and add two more courses.
Monday, December 1, 2008
Breadhunter's New Brick Oven

No, it's not done, but I have started, and what you see is indeed a soupy mess. On top of all the rubble and gravel, I'll be placing a layer of crushed stone to support the concrete block base. My idea is to build an oven without mud or mortar, that can easily be disassembled and moved to another location. To complete the project, few carpentry or masonry will be required. If everything goes as Breadhunter hopes, a manual detailing the project will be published. In the meantime, photos will document the daily process.
Tuesday, November 18, 2008
Chuck's Oven Door
Here are a few photos of Chuck's oven door. He had the sheet metal bent by a friend who has a metal brake. Chuck screwed through a thin piece of plywood into the metal and then filled the shallow cavity with fiberglass. He says he has a much easier way of doing it next time.


 Check out previous posts concerning Chuck's movable oven.


 Check out previous posts concerning Chuck's movable oven.
Friday, November 14, 2008
A Foolish Consistency
Ralph Waldo Emerson said "A foolish consistency is the hobgoblin of little minds."
How right he was. My favorite breads to bake are sourdough breads and probably they always will be, but they take time, lots of time. What if you're struck with the desire to bake some bread and all you do is sourdough, then you're stymied unless you planned a day in advance. Recently I've overcome my sourdough fixation, and when no one is looking (just joking) I'll sneak a teaspoon of dehydrated yeast into my bread mix, and...well you know what that does. Or, I'll make some tortillas (yes, they're bread) with just flour and water. There's always a way. Rigidity is a dead end.
How right he was. My favorite breads to bake are sourdough breads and probably they always will be, but they take time, lots of time. What if you're struck with the desire to bake some bread and all you do is sourdough, then you're stymied unless you planned a day in advance. Recently I've overcome my sourdough fixation, and when no one is looking (just joking) I'll sneak a teaspoon of dehydrated yeast into my bread mix, and...well you know what that does. Or, I'll make some tortillas (yes, they're bread) with just flour and water. There's always a way. Rigidity is a dead end.
Thursday, November 13, 2008
The Bread That Disappeared
 Straight From The Oven
Long ago I read about a Buddhist meditation where one visualizes one's body after death and imagines its deterioration as it goes back to its source. That is a very serious meditation, but in a lighter vein, I thought we could look at the transformation of a loaf of bread. I had wanted to leave the bread in one place and that was on the stair by the front door. However, there was quite soon, a discernible lack of visitors, and this was easily attributable to the horrendous smell and the presence of very nasty looking flies. So the bread was moved.
To watch a slide show of the disappearing bread, go here: www.breadhunter.com
Then click on Disappearing Bread
Tuesday, November 11, 2008
Movable Oven (potential problem)
The interior baking height of Chuck's oven is only 9". Normally, an oven height of 15"-16" is about standard. Chuck and I discussed this potential problem, but he felt that since the oven could easily be dismantled (no mortar used), then if there were a problem, it could quickly be corrected.
I was concerned at first that we might even have trouble starting a fire because of the low oven height, but our first fire started right up.
I don't see a problem making flat breads and pizzas, but a raised loaf might be a different story.
We will see.
I was concerned at first that we might even have trouble starting a fire because of the low oven height, but our first fire started right up.
I don't see a problem making flat breads and pizzas, but a raised loaf might be a different story.
We will see.
Friday, November 7, 2008
Movable Oven Costs
Wednesday, November 5, 2008
Movable Oven
So often people are reluctant to build earth or masonry ovens because they're afraid that once constructed, the oven will have to reside on its given location for eternity or even longer. Their fear is well-founded.
This oven, built and designed by Chuck Lakin, has an oven base made from wood and held together by screws. The oven proper is firebrick with a roof supported by angle iron. No cement or mortar has been used. The idea was to build a masonry oven that could easily be dismantled, moved to another place in the yard, or be fired up in a distant location.
This oven, built and designed by Chuck Lakin, has an oven base made from wood and held together by screws. The oven proper is firebrick with a roof supported by angle iron. No cement or mortar has been used. The idea was to build a masonry oven that could easily be dismantled, moved to another place in the yard, or be fired up in a distant location.
 Chuck assembles the wooden base
 The base sits on a crushed stone bed that facilitates good drainage in a wet area
 Chuck assembles the angle iron that will support the interior oven roof
 Perlite insulation is spread across the top of the oven
 The completed oven with a metal roof and shelves to hold baking supplies and oven tools.
Note the shelf under the oven for firewood storage.
Much more about this oven in future posts
Much more about this oven in future posts
Thursday, October 23, 2008
Break the Paradigm
After establishing basic bread baking or oven making procedures, we tend to settle in and get comfortable. That's okay, but real learning and surprises take place when we break the paradigm.

A long, long time ago I was an avid fly fisherman. Not having caught anything and anxious to get home, I reeled my fly in as fast as possible just to get done for the day. The fly skimmed along the surface of the water, and bango, a very acceptable salmon struck. Inadvertently, I had learned a new fly fishing technique.

Talking to a baker friend today, he told me that last week he had rushed all his sourdough procedures, being quite haphazard, and he made the best loaves he had ever made.
Don't be afraid to take chances. Take big ones.

Friday, October 10, 2008
One Wheel Oven

Certainly a novel use for a wheelbarrow. This installation definitely looks permanent, and to me, it is heartening that so many people break all the rules and follow their own paths. Just when you think you've seen it all, something new comes around the bend.
Saturday, October 4, 2008
Tire Obsession
Putting a discarded, huge tire to good use. For fill, there are even smaller tires inside the big one. A novel approach to recycling. Go to the slide show to see the entire earth oven construction process.
picasaweb.google.com/.../JgRsrQHIGCpMN5G3WWFNGg
picasaweb.google.com/.../


 I wonder what he's going to do with the yellow road sign.
Wednesday, October 1, 2008
Salt
Just before slicing into a loaf of bread I made yesterday, I had the sinking feeling that I had forgotten to add salt. Maybe, I thought, I'd never notice the difference, but I did. In fact the bread was absolutely insipid, totally without sparkle. I'm baking a "real one" today.
What I found most interesting was the dough acted just like a dough that had salt added to it. The conventional wisdom is that you need the salt not only for flavor, but you also need it to strengthen the gluten. Some even say the dough can rise out of control.
For me, the only certainty is that you need the salt for flavor, to make the bread taste like bread.
Wednesday, September 17, 2008
Earth Oven Insulation
 I know that many earth oven builders have been using a mixture of sawdust with clay slip for insulation, and I have been one of them. A few days ago I made of a mixture of 6 parts sawdust to 1 part Portland cement, added a little water and formed a tight ball. I did this again, but this time I used 6 parts Perlite to 1 part Portland cement.
 After both samples had hardened, I subjected them both to oven heat. As you can see by the photos, the one made with Perlite was untouched by the heat, but the one made with sawdust had completely disintegrated. Maybe the sawdust has some insulation value even in a disintegrated state. I don't know. Even if the sawdust had held up, Perlite still has about twice the insulation value.
 Sawdust is free, but you have to buy Perlite. It's your decision to make.
For lots more information about bread and earth oven construction:
Breadhunter.com
Here's an email I just from received from Kiko Denzer, who probably knows more than anyone about earth oven construction.
|
Hey, Stu,
Interesting that the perlite held together w/cement. I would have expected both of them to crumble. My understanding is that cement starts to break down over 700F. And with perlite, there’s really no need to use cement at all, unless you’re building an Alan Scott style oven and need the strength. Otherwise, the addition of cement only reduces insulation value.
The practical test for the sawdust clay mix is to get enough clay into it that when the sawdust is burnt out, you’re left w/a foam that’s high enough in clay to maintain it’s form (and when needed, i.e., for under the hearth, to support weight). Obvioustly, it’s not the sawdust that’s providing the insulation — it’s the clay, in which the burning of the sawdust has created voids. It’s a cheap/easy way to manufacture your own insulating firebrick — but it does help to do some tests. Or, to err on the side of too much clay. Or, under the hearth, to use empty glass bottles for structural support.
I have also had success using a mix of clay AND portland with sawdust — that way, you get the quick setting of the cement, and the lasting power of the clay. Tho if you need such a combo of traits, it’s cheaper and nice to use plaster of paris (gypsum plaster).
-- Kiko Denzer
Hand Print Press • POB 576 • Blodgett OR 97326 • 541-438-4300
http://www.handprintpress.com • http://www.digyourhandsinthedirt.net
"What we learn to do, we learn by doing" – Aristotle
BLOG: http://kikodenzer.blogspot.com/
Interesting that the perlite held together w/cement. I would have expected both of them to crumble. My understanding is that cement starts to break down over 700F. And with perlite, there’s really no need to use cement at all, unless you’re building an Alan Scott style oven and need the strength. Otherwise, the addition of cement only reduces insulation value.
The practical test for the sawdust clay mix is to get enough clay into it that when the sawdust is burnt out, you’re left w/a foam that’s high enough in clay to maintain it’s form (and when needed, i.e., for under the hearth, to support weight). Obvioustly, it’s not the sawdust that’s providing the insulation — it’s the clay, in which the burning of the sawdust has created voids. It’s a cheap/easy way to manufacture your own insulating firebrick — but it does help to do some tests. Or, to err on the side of too much clay. Or, under the hearth, to use empty glass bottles for structural support.
I have also had success using a mix of clay AND portland with sawdust — that way, you get the quick setting of the cement, and the lasting power of the clay. Tho if you need such a combo of traits, it’s cheaper and nice to use plaster of paris (gypsum plaster).
-- Kiko Denzer
Hand Print Press • POB 576 • Blodgett OR 97326 • 541-438-4300
http://www.handprintpress.com • http://www.
"What we learn to do, we learn by doing" – Aristotle
BLOG: http://kikodenzer.blogspot.
Subscribe to:
Posts (Atom)