Saturday, May 22, 2010

from Bread Earth and Fire

The Earth Oven con't
Base complete, insulated, top slab and firebricks in place
Building the Base
 Abbott scrutinized the rock pile as he would have scrutinized the film he got back from the lab when filmmaking. Deciding which rocks went where was an editing process just like building a movie in the editing studio. At this point I knew when to retreat and stay back. Abbott decided with a little help from Nancy where the rocks would go. Looking down you’ll need at least a 36 inch void in the rock base. This is important because we need to leave room for rubble, insulation and another concrete slab. What, another concrete slab! Yes, but it won’t be as big as the one you just did, and it won’t take long to do. What you don’t want to have happen is that you realize you haven’t given yourself enough interior space and to gain it, you have to start flaring out your rock base. I’m afraid you won’t like the look. Give yourself enough room.
Lay the rocks in dry. After going up about 12 inches, mix up some mortar and with your trowel and/or gloved hand, work the mortar between the rocks on the inside of the base. That should do it, but don’t count on the mortar to keep your rocks from falling over. Use your bag of mortar mix, not your bag of concrete mix. If you want to look at mortared joints (nothing wrong with that), than mortar the outside as well. Only mix up a little mortar at a time because what’s left over can’t be saved. If you do have left over mortar, use your imagination and make some art objects.
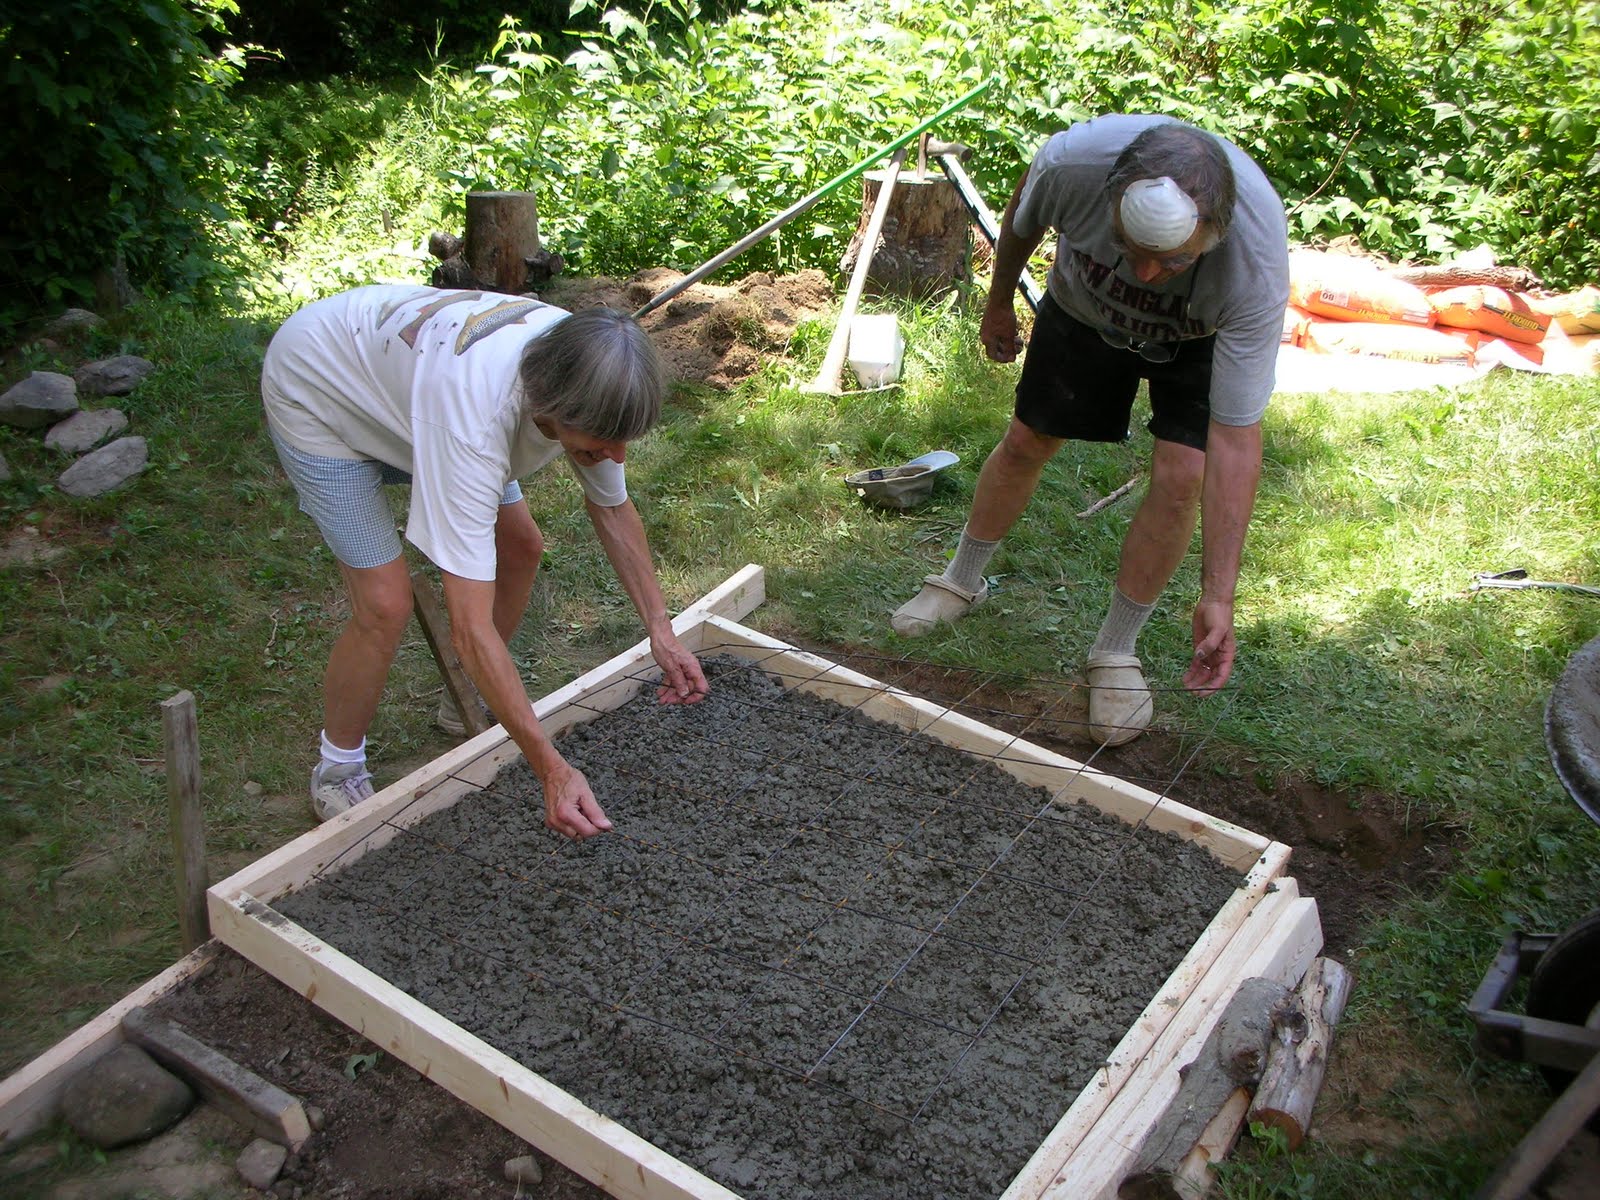
Now it is time to start filling the oven base cavity. Begin to fill the inside of the oven base with rubble such as stone, broken bricks, broken concrete blocks, and assorted iron objects. In between the rubble, dump in some gravel, tamp it lightly, and be careful that you’re not putting pressure on the rocks you’ve just laid up. Don’t add any organic material to the rubble because it will break down and weaken the mass of rubble. Your rubble and your rock base have to be nice and solid all over because they’re going to support a lot of weight.
Continue with your rock base, using mortar between the rocks, and go up another 12 inches. Fill the interior with more rubble, just like before, but smooth off the top of the rubble with sand or gravel. You should now be 24 inches above your concrete slab, and that’s where you want to be. Finally, go up another 12 inches with the rock base, using mortar between the rocks, but do not fill the top foot with rubble.
Following these instructions, your oven will have a baking height (from where you stand to top of baking hearth) of about 38 1/4 inches You can adjust the baking height by simply making the oven base taller or shorter. However, I wouldn’t go lower than 36 inches nor would I go higher than 48 inches. Low ovens require less work to construct, while high ovens require more.
That said, it still is not so simple to determine the correct baking height. If you’re over six feet tall, than you would want a higher hearth than someone who is only five feet tall. A tall person doesn’t want to constantly have to bend over to peer inside the oven, and yet, loading firewood and maneuvering breads around in an oven with a very high hearth takes more physical effort.
When I had a brick oven café, I built the hearth very high, but that’s because I wanted patrons to be able to see the fire in the oven when they entered the café. This presented a problem, however, because we had some very short bakers who really struggled to work the oven. The photo clearly shows that the oven was much too high for the young baker. Give some serious thought to your hearth height because it’s something that would be very difficult to change later on.


--
www.ibreadhunter.blogspot.com

Friday, May 21, 2010

Oven Australia

Beautiful oven constructed by Ric Galt.  Note the metal roof fabricated from a corrugated steel water tank.

from Bread Earth and Fire (The Earth Oven)

 con't The Earth Oven
 
You’ll probably find some coarse gravel at the top of the slab, but if you wait just a little bit until it starts to set up, you should be able to trowel it fairly smooth. Don’t worry if it’s not perfect, ours wasn’t and it didn’t matter because the rocks we used for the base were all irregular, and these sat on top of the slab. After your slab gets hard (concrete dries fast in hot weather), and it might only take a couple of hours, you should hose the top of it because you don’t want the top to dry very much faster than the interior. Instead of hosing the slab, you could cover it with a tarp to slow down the drying process. No matter what you do, the next day you should be able to knock off the wooden form and start building up. Although your slab feels hard to the touch, it really takes at least a week for it to fully harden. It’s okay to work on it now, but be aware that you should not drop heavy items on it or walk along its very edge. Abbott and Nancy chose to build the oven base with rocks because aesthetically it worked for them and to get the rocks we had to take their canoes up a lovely Maine river where we found them in a pile. We were very fortunate indeed, because the rocks were left over from where giant towers supporting high-tension lines were sunk into the ground.When searching for oven materials, if what you find is not on your property, then it probably belongs to someone else. Get permission before you take anything, even if it’s only a stone or a pail full of sand or clay.The rocks we took for our project were irregular, but mostly flat and not heavy. However, it took multiple canoe trips to get all we needed, and then we had to load them into a wheelbarrow to haul uphill. Canoeing was fun, but hauling the rocks uphill wasn’t, as the rocks seemed to become heavier and heavier.Yes, there are easier ways to get rocks. You might consider going to Big Box to buy them. Some companies that do landscaping will deliver them to your building site, but you must pay for this service. Nevertheless, you might think it’s a great deal (especially after you’ve done the hauling yourself), but shop around. Nobody says you have to use rocks for your base. In fact, building a rock base will take longer than building your oven proper. An alternative would be cement blocks. They are cheap, functional and easy to use. If you don’t like the industrial look, you can stucco the blocks, add a colorant or paint them. If you decide on a block base, then it’s easier to make a square rather than round base, but you can buy curved blocks if you really want a round base.  If you choose to have a square base, the oven can still be round. Obviously, we preferred the rock look.Find the center point of the slab, and with a string and felt tip pen, draw the biggest circle you can and that should give you a diameter of 48”. The circle defines the outer perimeter of your rocks. In retrospect, however, had we centered the rocks over the drawn circle, we would have had more room inside the base for insulation and the top slab. I recommend centering the rocks over the circle. Of course you could have made the slab bigger, but that would have been more work. to be con't

Thursday, May 20, 2010

from Bread Earth and Fire (The Earth Oven)

 THE EARTH OVEN
When you’re done filling the hole with gravel, tamp it down by jumping on it or pounding it with a heavy object. Get is as level as possible, and this is where a four foot level proves very useful.
  It’s time to build the form that will contain the wet concrete. The interior measurement should be 48 X  48 inches. You might say, as I have, “Oh, I just need to buy two - 2 X 4 X 8’s. “Sorry, it won’t work. To make your form, the 2 X 4’s need to overlap. So this is what you need: two pieces 48 inches. 2 pieces 51 inches. Use one-2 X 4 X 8 and one-2 X 4 X 10. Cut the wood with a circular saw, radial arm saw, chop saw or hand saw. Take your time, and cut accurately. Measure twice and cut once, and probably you’ve heard that before. Nail your wooden frame together and center it on the gravel bed. Don’t forget to level the form. You don’t want a parallelogram so measure the diagonals. The number should be the same. For such a small area, this should not be hard to do, at least that’s what I tell myself, and yet, I always find myself making lots of adjustments.
 Measuring the diagonals
Let’s mix up the concrete now. By the way, folks often use the terms cement and concrete interchangeably, but they are different compositions. Cement is a building material that is a powder, made by burning a mixture of shale or clay. It is used with water, sand or gravel to make concrete and mortar. Assuming you’ve purchased bags of ready mix concrete, you’ll only need to add water. Yes, it’s possible to buy Portland cement and mix this with the right proportions of sand and gravel, add water, and you’ll have concrete. For a small job, it’s simply easier to buy the ready mix, and that’s what Abbott and Nancy did. This is not a project to do in freezing weather. Concrete will not set up properly unless specially treated.
Assuming you have a large wheelbarrow, dump in a full bag of concrete mix. Cut the paper off the bag after it’s in the wheelbarrow. Don’t breath concrete dust, perlite dust, or clay dust. In fact, try not to breath dust. Wear a dust mask if necessary. On the bag of concrete mix it will tell you how much water to add, but we didn’t go by this. With the garden hose we added a small amount of water at a time, always using our hoes to make a homogeneous mixture. Too much water makes for a weaker mixture. Not enough water makes it hard to pour. If you’re not sure about how much water to add, then go by the instructions on the bag. Fill your wooden form about half way up, making certain that the concrete is flush against the form with no air pockets, and then place the remesh on the concrete.

Laying Remesh
You can easily bend and fold the remesh so it will fit inside the form. It provides strength to the concrete. You don’t want the remesh on the bottom of the concrete slab, and you don’t want it sticking up through the top. If it’s on the bottom or top, it will add no strength to the slab. Position it so that it remains in the middle of the slab.
Now continue filling the form with concrete until it’s slightly higher than the top of the form. As you pour, jab into the concrete so you won’t have any voids in the slab. Don’t fill half the form, break for lunch, then come back to finish the slab. Depending on the weather it could set up very fast. Your slab will be better if you finish the job without taking a break.
Rinse off your tools because the concrete will harden on them, well, like concrete, and it will be extremely difficult to remove. Fill up a plastic pail with water, and leave your tools in it. Be sure to thoroughly rinse off your wheelbarrow.
 Now you have to “strike off” or screed the slab you have just poured. Look at the photo. This is easiest done with two people. Rest a two by four on the wooden form, and with a sawing motion move it across the form. If you look carefully at the photo you’ll see that our two by four has been spliced together. This is not a good arrangement, but we had to make the splice because yours truly never could measure or count properly, and nobody wanted to make another trip to the store. To screed the slab, use a two by four by eight. No splices please. For the purposes of this book, folks who are not innumerate checked all my numbers.
to be continued


--

Wednesday, May 19, 2010

Purchased Clay

 mixing clay
Recently I have completed an earth oven that was made with clay purchased from a pottery supply store. The clay was extremely easy to work with. We mixed it with a hoe, one part clay with three parts sand in a wheel barrow and it was much, much easier that stomping the clay to smithereens with one's feet. The cost of the clay was minimal ($30.00) and the consistency was excellent. Building a circular oven with a 31" floor diameter, 15" dome height, 4" thick walls, we used about 125 pounds of clay. The type of clay we used was  fireclay (Hawthorne 40 mesh). If you happen to live in Maine, you can buy it in Portland. However, with kids present, you might want them to do the barefoot-in-the-mud dance.
stomping clay

Tuesday, May 18, 2010

from Bread Earth and Fire

 THE EARTH OVEN con't
 
Assuming you don’t have to buy any tools for the job, the cost of materials is relatively small considering what you’ll be getting. Abbott and Nancy spent about $250.00 on materials. Labor was free.No matter how careful and neat you are, expect the area where you’ll be doing your work to look like a construction site because that’s what it will be. Don’t leave nails sticking up in boards, and don’t leave tools on the ground where someone could step on them. Always think about your safety and the safety of others. Spread a couple of your tarps.After deciding on a spot for your oven, stake out the area. You’ll be pouring a concrete slab, 48 X 48 inches, but the area you stake out should be at least a foot bigger all the way around, or 60 X 60 inches because you need to give yourself some wiggle room. Now start digging. Abbott and Nancy dug down about one foot, and that seemed about right. Place the sod and topsoil in a pile away from the construction site, or it will just get in your way. However, save it because it’s alive, rich in nutrients, and after the sods decompose, you can shovel what remains into your garden or place around shrubbery. Fill your excavation with enough gravel so that when you pour your slab, it will be as high as your own mowed lawn (if you have one) or higher. You don’t want your slab to be underground.
to be continued

Monday, May 17, 2010

Name Change

I just changed the name of this blog to:
http://ibreadhunter.blogspot.com/
I thought it would be easier for me to remember.
Stu

Sunday, May 16, 2010

Mud and Foil

 successively layers of overlapping foil being applied
Here's a photo of an oven I worked on this past weekend. The baker does not want a cover over the oven, and this presents a real problem in protecting it from the elements. An unprotected mud oven in the northeast might disintegrate rather quickly so we decided to wrap the mud dome with aluminum foil. Any water that got to the foil would theoretically just drain down the side. Perhaps over the insulation we'll wrap the oven with another layer of foil become applying the stucco. There are some who say an oven needs to "breath," but after a mud oven has been fired to 1,000 degrees F., the dome becomes rock hard and the ability to breath seems to be a moot point.
There will definitely be an update on this oven.