Saturday, December 8, 2012

Ring Of Fire

If you need just a little push over the edge, than this photo by Will Brinton should encourage you to build your own wood-fired oven and bake the best pizzas you've never had.

                                                        Will Brinton      

Thursday, December 6, 2012

Best Bialys


BIALYS (pronounced bee-ah-lees)
I’m not really sure where bialys originated, but my guess would be Poland because that country has a large city called Bialystok. Many Jews emigrated from Poland to America, and some of these émigrés had superb baking skills.
 On New York City’s Lower East Side, I know of a bakery that specializes in the production of Bialys; these are chewy rolls with flattened or concave centers into which chopped onion and poppy seeds have been mushed. To my knowledge and taste, this bakery in New York is the only place where authentic bialys are made. I’ve eaten bialys from other American cities, but they were really dismal breads. Your best chance for a good bialy will be in your kitchen after you learn how to make them.
The essence of a good bialy is its chewiness, and one way to produce chewiness is through the use of high gluten flour. In my book Bread In Time, I outline that technique. Another way to get a chewy texture is with sourdough starter, and I’m pretty sure the traditional bialy was made that way and not with high gluten flour. The baker can create sourdough, while high gluten flour is a specialty flour that most likely wasn’t even available when bialys were developed.
You may very well want to double the ingredients in this recipe, which of course, will double the yield. I make this suggestion because bialys are a special treat, and they’ll disappear quickly. Do not double the amount of starter you use. One quarter cup is enough. 

YIELD: approx. 12-3 1/2” diameter) bialys
Day one
Ingredients:
1 1/2 cups cool water 
1/4 cup sourdough starter 
1 1/2 teaspoons sea salt                                                                                                   
3 1/2 cups all purpose unbleached white flour

Procedure:
Combine all ingredients into a shaggy mixture using a heavy wooded spoon or a dough whisk. Cover the bowl with a plate and let proof overnight about 12-17 hours. Room temperature should be about 70ºF.
Day two
Ingredients:
Flour for dusting
1/2 cup chopped onions (use caramelized onions for the very best bialys)
1 tablespoon poppy seeds
1/2 teaspoon salt
Procedure:
Your dough should have expanded overnight, and now turn it out on your floured work surface. With floured hands, work the dough a bit by folding it in on itself into thirds. Do this several times, and then cover the dough with a cloth letting it rest about 15 minutes. After the rest period, flatten the dough by hand and then roll it out with a rolling pin to a uniform thickness of about 1/2”. 
Cut out the bialys. I use an empty 3 1/2” diameter juice can to punch out the bialys by bearing down firmly. If you prefer, you can cut the dough into 12 equal chunks, and with your hands, press each bialy into shape. Cover them again with a cloth and set them in a warm place to rest and rise for 30 minutes. While you’re waiting, chop the onions and get out the salt and the poppy seeds.
In the top center of each bialy deposit a pinch of chopped onions, some poppy seeds and a tiny bit of salt. With your fist, mush these ingredients into each bialy. Don’t be afraid to mush down hard. It’s important to really press the ingredients into the center of the bialy, and if the dough tears, don’t worry about it. If you’re not diligent about this, the center of your bialy will rise in the oven and you will have made a roll, not a bialy. That’s not exactly a bad thing to do, but it wasn’t part of your plan. 
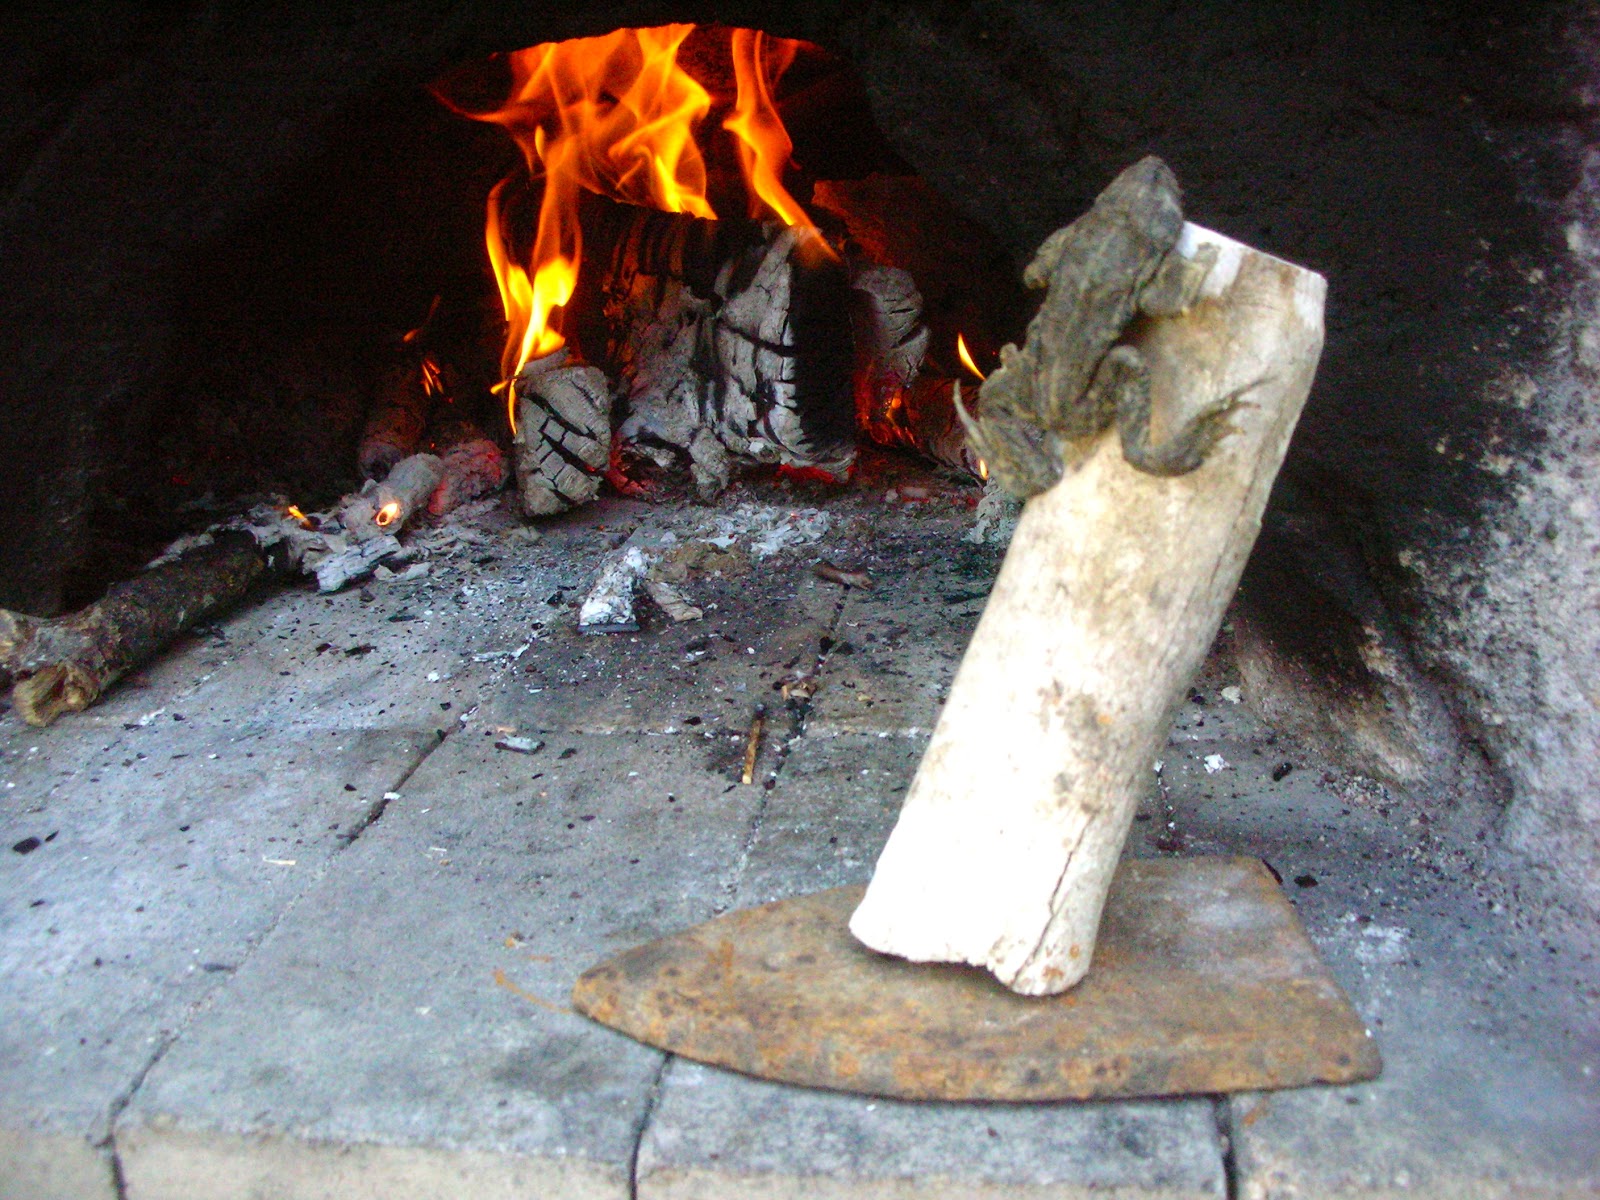
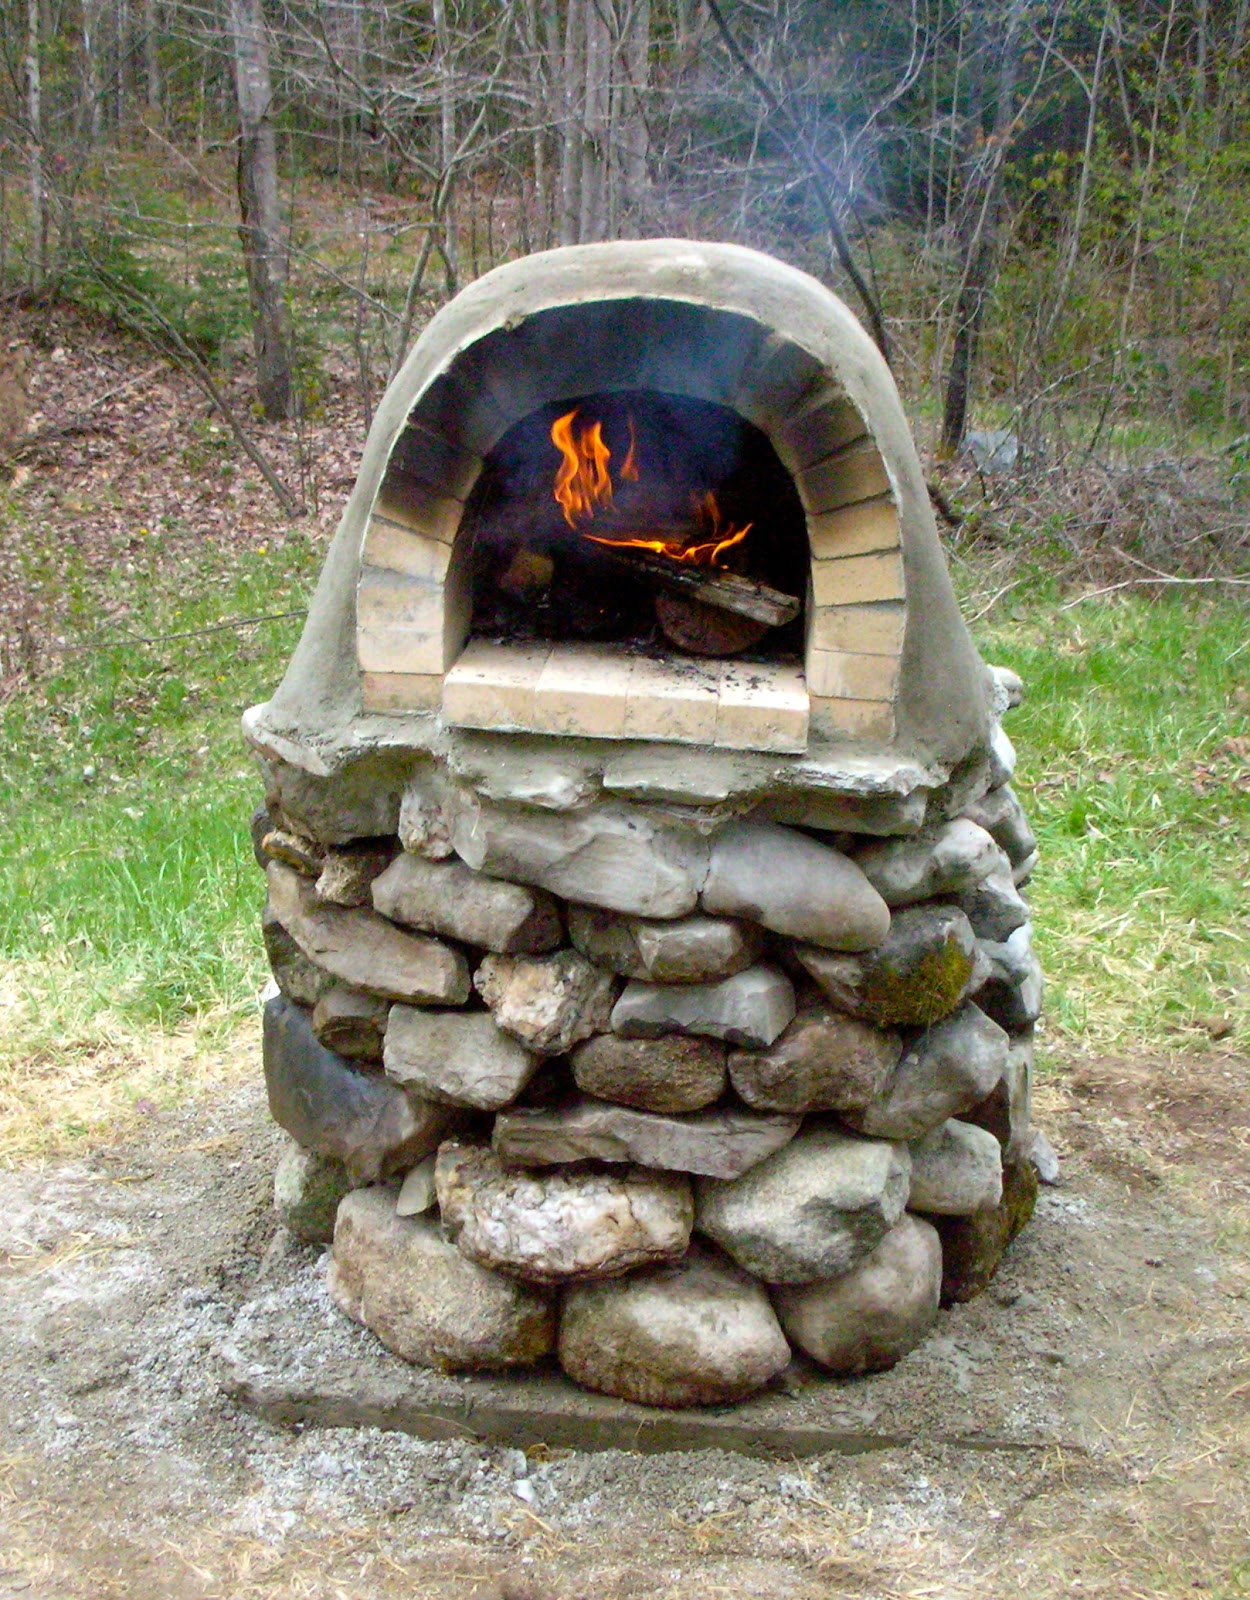
Bake directly on the floor of your oven with a small fire to the back or side. Adjust your fire accordingly and move the bialys around to get them to bake evenly. 
Ideally the centers should still be flattened when the bialys emerge from the oven, but this will not always be the case. Don’t worry; they’ll still be delicious even if they rise like rolls.


Friday, November 23, 2012

Keeping it dry

If you stucco your oven with surface bonding cement you can expect your dome to stay "reasonably" dry. However, that's really not good enough. If your earthen dome should get wet, it really doesn't take much for it to revert back to its natural state, and that would be "mud."
For maximum protection, consider a roof, and it can be as primitive as the roof over the Siberian oven, but by far, the simplest roof I know how to make is to drape corrugated metal roofing over the dome and fasten the four corners with bungee cables tied into the oven base.


 Oven stuccoed with surface bonding cement

                                       
Simple roofing system

Easiest roofing system

Tuesday, November 13, 2012

Amanda's Oven

Following up on the last post, I want to add some photos just to give an idea as to how much work was required to complete the oven. It was truly a group effort, and had not everyone really put out, then the oven would not have turned out as well as it did.
Keeping organized and having all the supplies right on the building site when we needed them helped immensely.


Completed Oven

But to get here, check out some of the construction photos.


                                                                              photo Amanda Slamm                                     


                                                                                   photo Amanda Slamm 

                                    
                                                                                    photo Amanda Slamm                                              


Sunday, November 11, 2012

Favorite Oven


I just completed an oven with a group of friends that quickly became my favorite oven.
A 31.5" diameter baking surface is big enough for all the breads and pizzas most of us would care to bake with one firing. 6" of perlite insulation above, around and below provide ample insulation to hold in the heat. Finally and equally important, I love the clean, minimalist look.
Thanks to Amanda, Reuben, Paula, Abby and Fang for helping to build this earth oven.


Life before mud

Mud


Hands


First firing before dome insulation


Completed oven


Tuesday, October 30, 2012

Masons Who Build Wood-Fired Bread Oven

If you still want an oven (of course you do) and you don't want to construct it yourself nor do you want to be purchase a prefab oven, well, there's still hope. Lots of it.
You can hire a mason to build one for you. Yes, your labor cost will be high, but the cost of materials will be less than what you would pay for a prefab oven, so everything sort of evens out.
If you decide to hire a mason, find one who has lots of experience building ovens. You're not looking for a mason who specializes in retaining walls.
I'm going to recommend three masons, two in Maine and one in Massachusetts. Sure there are lots more, but I happen to know the work of these three, and if you hire one of them, I know you'll be pleased.

Pat Manley from Maine building the Sunnyfield Farm Bakery oven


An oven by Martin Pearson from Massachusetts

David Neufeld from Maine

Monday, October 22, 2012

Le Panyol Wood-Fired Ovens

Not everyone really wants to build their own wood-fired oven, but there are great alternatives out there. Maine Wood Heat imports the beautiful le Panyol oven from France. No, they're not inexpensive and you'll have to have someone assemble it for you if you don't have masonry skills, but they are of the highest quality.
You could alternatively hire a mason to build you a custom oven (if you go this route, just make sure you hire a mason with a good track record who has built ovens before), and in a future post, I'll discuss this in some detail. In the meantime, check out the Le Panyol and also visit the Forno Bravo site for more wood-fired ovens.

Le Panyol on wheels


Le Panyol in winter with a copper cover to protect it from the elements

Thursday, October 4, 2012

French Rolling Pin

I just started using a French rolling pin, and I couldn't be happier. For years, I had been using the standard American style rolling pin. You know the type, clunky with two handles.


Anyway, the French rolling pin is much easier to handle, and you'll find that you have lots more flexibility when rolling out a dough.
You can find one at a kitchen supply store, and that's where I found mine. However, you can easily find one on line. Breadtopia has them at a very fair price.


Wednesday, September 26, 2012

The Snake Test

When constructing an earth (clay/cob/mud, all basically the same) oven, probably the trickiest part is your clay/sand/water mixture. I like 2 parts all-purpose sand to 1 part clay and enough water to get the right texture. It's the texture that poses the problems. Your can write about it, but you really have to get your hands into the mud to know what it feels like.
If you add too much water, then your oven will slump as it's being built, and that's not good.
If you add too little water, then your mixture will be too dry and not clump together properly.
To determine if you actually are working with clay, perform the snake test as shown below.

 Abbott Meader

If it's clay, then it should hold together

Sunday, September 23, 2012

Bread Magazine


Check out this magazine concerning bread. It's free, and there are lots of interesting articles. 

Bread (issue 3 fermentation)


It's time for another magazine full of bread making inspiration and information: Issue 3 of Bread takes a close look at the topic of fermentation through instructions, baker interviews and tips. Among other things, inside the magazine you'll find the following articles:


INTERVIEW: YING SHI
(interview with her in the magazine)
Ying Shi—better known in the online world as txfarmer—is a software engineer and passionate home baker always looking for ways to improve her craft. Her skills are a great example of where deliberate practice will get you. 


Monday, September 17, 2012

Earth Oven Workshop

We just completed another successful earth oven workshop in Waterville, Maine. Thanks to everyone who participated.  
Photos by M. J. and Tom Zirolli

 oven class

 oven base being insulated with perlite

After firing the tiny oven for a couple of hours, the bottom of the plywood base was only warm to the touch. Nevertheless, if you're building a more substantial oven, wood should not be used for a base.
Please see last couple of posts concerning potential fire hazards with wooden bases.

Sunday, September 16, 2012

Fire Hazard Alert II

I want to share a photo of an oven base that was constructed on 3/4" plywood, then perlite, with a 2"X4" framework. Although there was 3 1/2" of perlite insulation between the firebrick floor and the plywood, it still burnt through. A hole was actually burnt through the plywood, and that's a very serious matter particularly if your oven is sitting on a wooden deck. As I said in my last post, it's best to avoid wooden bases unless your oven is very small and you've determined that there's no way it could burn through.
If you search the web for wood-fired ovens, you'll see lots that are built on wooden bases, but masonry or stone would be better choices.
Assuming you're still determined to build on a wooden base, instead of a 2"X4" framework, you could use a 2"X6", and that would give you lots more room for insulation.
Pour in the perlite insulation to about 1" from the top of the framework. For the last one inch,  mix 6 parts perlite to 1 part Portland cement, and then add some water to the mix until the perlite clumps together. This would be your final layer of floor insulation, and the Portland cement will harden the perlite enough to provide a better footing for your floor bricks.
It's best to use as little Portland cement as possible because the cement will create thermal boulevards reducing the perlite's insulation value.

Burnt Out Oven Base

Friday, August 31, 2012

Fire Hazard Alert


It's my understanding that when wood gets hot repeatedly, it degrades more and more, making it easier to ignite. Everything can be fine for awhile, but then...
I believe that it's very risky to have plywood under the oven particularly if the plywood is sitting on a flat surface where air can't circulate.
However, if your floor mass is really substantial, I think a wooden base may be a little more protected from damaging heat, but I'm not certain about this.
If it's a tiny demonstration oven, then it might not matter because it would be difficult to bring a tiny oven up to a high operating temperature, but even here, there might be exceptions.
Based on what I've observed, I believe it's best not to have wood under the oven. Period.


Here is a photo of a demonstration portable brick oven where the brick floor sits directly on 3.5" of perlite. Supporting the oven is 3/4"plywood. The oven was assembled on a wooden picnic table, and the heat from the oven damaged the table. For safety purposes, the oven should have been assembled on saw horses and probably twice as much perlite should have been used.

Monday, August 27, 2012

More Flat Breads

Every time I make flat breads with my non-oven, I am continually amazed concerning how easy they are to make and how great they taste. Yes, I still bake loaves in my wood-fired oven, but the process is very complex indeed.
It's really difficult to achieve a flat bread failure and perhaps that's one of the reasons why flat breads are much more universally found than leavened loaves. Most flat breads do have some sort of leavening agent, and  yes, I know it's an oxymoron.
Just last night we made flat breads, added goat cheese, tomatoes, onions, garlic and extra virgin olive oil. We simply folded up the warm flat breads with everything inside (next time I'll try to include a photo), and I really can't recall anything ever tasting better.


Tuesday, August 7, 2012

Oven Building Workshops

Adult Ed. fall 2012


Build a Wood-Fired Pizza/Bread Oven!
(Waterville)
If you ever wanted to have a pizza oven in your backyard, then join me and learn how to build various types of wood-fired pizza/bread ovens. No experience required. Participants will work with clay and brick and construct low-cost ovens that will make the best pizzas and breads. Instructional videos will also be shown.  Discussions include techniques for making pizzas, flat breads, sourdough, and no-knead breads. Unique sourdough starter will be shared with all in class. Everyone will get to bake in the instructor’s oven and contribute to the pizza party at the end of class. The oven we construct will be auctioned off after lunch and the funds received will be donated to Masons On A Mission ( a charitable organization that builds stoves for the Mayas in Guatemala)
Class will be offered twice. Saturday, Sept. 15 and Saturday, Sept. 29. Registration begins this week.
Sign up here Waterville, Maine Adult Ed 

Tuesday, July 31, 2012

Kneading Conference 2012/Oven Mojo

If you've never been to a Kneading Conference, then I would highly recommend you attend one in the future. It's not likely you'll be disappointed.

 Just a few of the earth oven workshop participants


Earth oven mojo who kept watch during the oven construction

Monday, July 16, 2012

Fornax

Here's what Hall Kern says about Fornax (see name of side of oven):
"fornax is Latin for oven or furnace. Capitalized, as on my oven, Fornax is the Roman goddess of ovens. It is her job to see to it that the grain harvest is bountiful, the bread doesn't burn in the oven, and the fire in the oven doesn't escape and burn down one's home. It is the wise baker indeed who makes an offering of flour to Fornax before baking. If the baking goes well, then obviously  she accepted the offering; but if, on the other hand,  the food burns, well then she has rejected the offering."
Photo of Hall's recently completed oven. In terms of style, I would say that this is the first oven I've seen that would fall into the genre of "outsider art." I love it.


Friday, July 6, 2012

Bread Plus

I never really thought I'd be baking anything other than bread in my wood-fired oven, but then I realized that it's really a shame to waste all that residual heat. It took lots of energy to create the heat, and it didn't come from from a non-polluting resource like the sun.
It fact, some French Canadians, after all their cooking was done in their wood-fired ovens,  would dry the diapers. Why not?
Well, I had a chicken to roast. After the bread came out, I placed a medium-size chicken in my cast iron frying pan, seasoned with salt, pepper and olive oil. Into the oven it went. Two hours later with the door closed, it was done. An added benefit was that it took no gas or electricity to roast, and there was no need to heat up the kitchen during the summer.
Yes, the chicken tasted great.


Tuesday, June 26, 2012

France 2012

I'm just back from France and I had the golden opportunity to work with a French baker using his wood-fired oven. In all honesty though, he only allowed me to slide the dough from the peel into the oven.

French baker slashes dough


The dough is slid onto the circular oven floor that turns like a carrousel. Note the "steering wheel" on the left. Baker turns the steering wheel when he wants to rotate the dough to help him achieve an even bake. The door has a glass viewing window so you always have a view of what's happening inside. To get the dough inside the oven you have to push open the spring loaded oven door with the peel. This insures that little heat is lost because the door closes automatically when the peel is withdrawn.
Another great thing about this oven is the firebox. It's on the side of the oven, and you can continuously feed the fire while you bake. Through a convoluted system, the heat from the fire finds it's way to the oven proper. 
Consequently there's no downtime, and that's an amazing advantage if you're a commercial baker.


Monday, June 4, 2012

A Fine Looking Oven


A fine looking oven built by Hall Kern. The oven can be moved around because wheels have been attached to the legs. The interior of the oven is fire brick with mud and insulation on the outside. Note the tool rack on the side.

Although Hall is not a mason (and I'm not either), he used a simple technique of working with a template that he moved along after he finished a course of bricks so that he could begin a new course. The partially completed oven shown above is one that I've had under construction for the past few weeks.

Saturday, June 2, 2012

Who Needs An Oven?

Well actually, you do need an oven, but a Dutch oven will do. Your Dutch oven in this situation will heat up very quickly and unless you're vigilant, you could reduce your potential loaf to a cinder in no time. I had a great time baking outdoors, and I highly suggest you give it a try.

 Heating up the Dutch oven

 The dough about to be baked

 Bread baking

 The bread is done with a small burnt spot on top. This was caused when the top of the dough came in contact with the top of the Dutch Oven. Too much oven spring!

New oven by the pond in the background.

Tuesday, May 29, 2012

Oven By The Pond (first pizza)

Last night was pizza night, and the oven performed in a stellar manner. 700ºF was reached (an ideal floor temperature) without any trouble, and the first pizza was not a "sacrificial pizza" as it so often can be. The pizza was thin, crisp, and the taste was good.

Mark Roman (master baker) helps out at the oven

A "fire door" is used to improve combustion, and in this situation, the fire door helps to prevent excessive heat loss. The fire door is constructed from metal with a small slot on the bottom to allow oxygen to get sucked into the oven and a large slot cut near the top to allow the smoke to exit.

 Fire Door

The next project will be to construct a "bake door" that will trap most of the heat in the oven, and this is necessary when baking raised loaves.

Sunday, May 20, 2012

Earth Oven Workshop

Hi
On Saturday, June 9, Roy Feihel and I will be leading an earth oven workshop on the Maine coast. You can expect to learn how to construct earth ovens (you'll be building them) and a simple, portable brick oven. We'll also be preparing lunch in the brick oven.


For detailed information about the workshop, go here:
www.squiretarboxinn.com/specials

Sunday, May 6, 2012

Oven By The Pond (first fire)

The oven has been insulated (but not with as much perlite as I had wanted) and stuccoed with surface bonding cement. The next step is to make a fire door and a bake door, but the oven is now ready for pizza and all kinds of flat breads.