Saturday, May 29, 2010

Foil Or No Foil

 Completed dry stack brick oven
Today I decided to tear down my dry stack brick oven and replace it with an earth oven. I was particularly interested in how well the aluminum foil held up since it is really a controversial matter. Anyway, the dry stack oven was about a year old, and probably it had been fired for pizza and bread approximately 50 times with dome temperatures getting to over 1,000 degree. The foil had been  multi-layered and enclosed the red bricks.
 Foiled dry stack oven
Over the foil was insulation, Perlite, with Porland cement added, six to one ratio. Over the perlite was a stucco of quarter inch surface bonding cement. There were some surface cracks in the stucco so probably a very small amount of moisture got in, but I didn't think it was a significant amount. Only later did a chunk of the stucco break off, and this I attribute to the intense fire rolling up over the front of the oven.
As you can see from the photos, there was significant deterioration of the foil. Not only had it become brittle and pock marked, but in some areas it had actually had been reduced to a powder. And this was only after one year. It is sort of hard to imagine that foil could have a significant benefit over the long haul.


No, this was not a scientific study, but I love experimenting with various materials in my quest for the perfect, low-cost bread oven and thought that my experience might be of some use.

Friday, May 28, 2010

from Bread Earth and Fire (The Earth Oven)

The Earth Oven con't
 applying stucco
 
Stucco the Dome
 Our last step will be to stucco the outside of the oven which you can do as soon as you finish insulating it. Make up a mud mixture of 1 part clay and 3 parts sand. To this, Abbott and Nancy added pine needles from the tree that was cut down by the oven. It was a small gesture of thanks to the tree as was firing the oven with its branches.
The stucco mix can be wetter than the mud you used to construct the oven against the sand form. They mixed the clay, sand and pine needles and troweled it over the insulation, also using their hands to apply it. 1/2 inch thickness is about right. If you don’t have pine needles, no problem, because you really don’t have to add anything to the clay and sand except water. Since you already have some straw you might chop up some to use with your stucco. To chop straw, toss some in a trash barrel, and then reach into the barrel with a weed wacker. That should work. Or, you might run over some straw with a lawnmower. If you use straw, chop it fairly fine so that it will spread smoothly on the oven. A stucco alternative is to use surface bonding cement that is fiberglass reinforced. You just add water and trowel it on about 1/2 inch thick. This is what I used on my dry stack brick oven.
Are we done? Not quite. We need to construct a cover for our earth oven. Without a cover, rain will severely damage it, changing the oven back to what it was before we started. Mud. to be con't.

Thursday, May 27, 2010


The Earth Oven con't

The next step is to insulate the earth oven. You can do this right away, take a break for lunch, do it the next day, or next week. In fact, you could build some small fires in your oven to dry it out, and then make pizzas and flat breads, doing the insulation after you’ve baked in the oven for a while. After having an oven collapse, and if it’s going to happen, then it’s better to have this awkward occurrence take place before the dome is insulated. Dry your dome out with small fires before you insulate it. Raised loaves, however, do much better in an insulated oven. Pizzas and flat breads don’t seem to care.
Anyway, there's no rush to insulate the oven. Fire the oven and make some pizzas. If you see some cracks, and probably you will, try patching them with your mud mixture. Just don’t be alarmed by the cracks. When clay dries it cracks. The greater percentage of clay to sand means more cracks. Don’t be tempted to use extra sand to lessen the potential cracks. More sand means less of a heat sink and a weaker oven. Small cracks should not compromise the integrity of your oven.
Start by packing the insulation around the bottom of your earth oven, and work your way to the top. It goes on and up a lot faster than the mud that you used against the sand mold. The insulation should be 4” thick. You could actually eliminate this layer of insulation, and your oven would still be fine for making pizzas and flat breads, but it would be terribly energy inefficient and raised loaves would be very difficult to bake properly. Abbott and Nancy insulated their oven immediately with perlite and a little sawdust, bonded together with clay slip. to be con't

Wednesday, May 26, 2010

Oven Cracks


Here's a problem that developed with surface bonding cement used to stucco an oven. Basically, the stucco held up fairly well except by the front of the oven. It is here where the intense oven heat washed over the stucco, and cement won't hold up to high oven temperatures. However, had refractory cement been used in the front, then there might not have been any damage. Some sort of heat shield could also work and a chimney might also have solved the problem, but then the construction becomes more complicated.

Tuesday, May 25, 2010

from Bread Earth and Fire (The Earth Oven)

The Earth Oven con't 


When the mud step is complete, add additional rocks to the base to get the base to its final height that should be about level with the top of the firebrick oven floor. However, the tongue should be about a 1/2 inch higher than the rocks because it will make it a little easier to get food in and out of the oven.
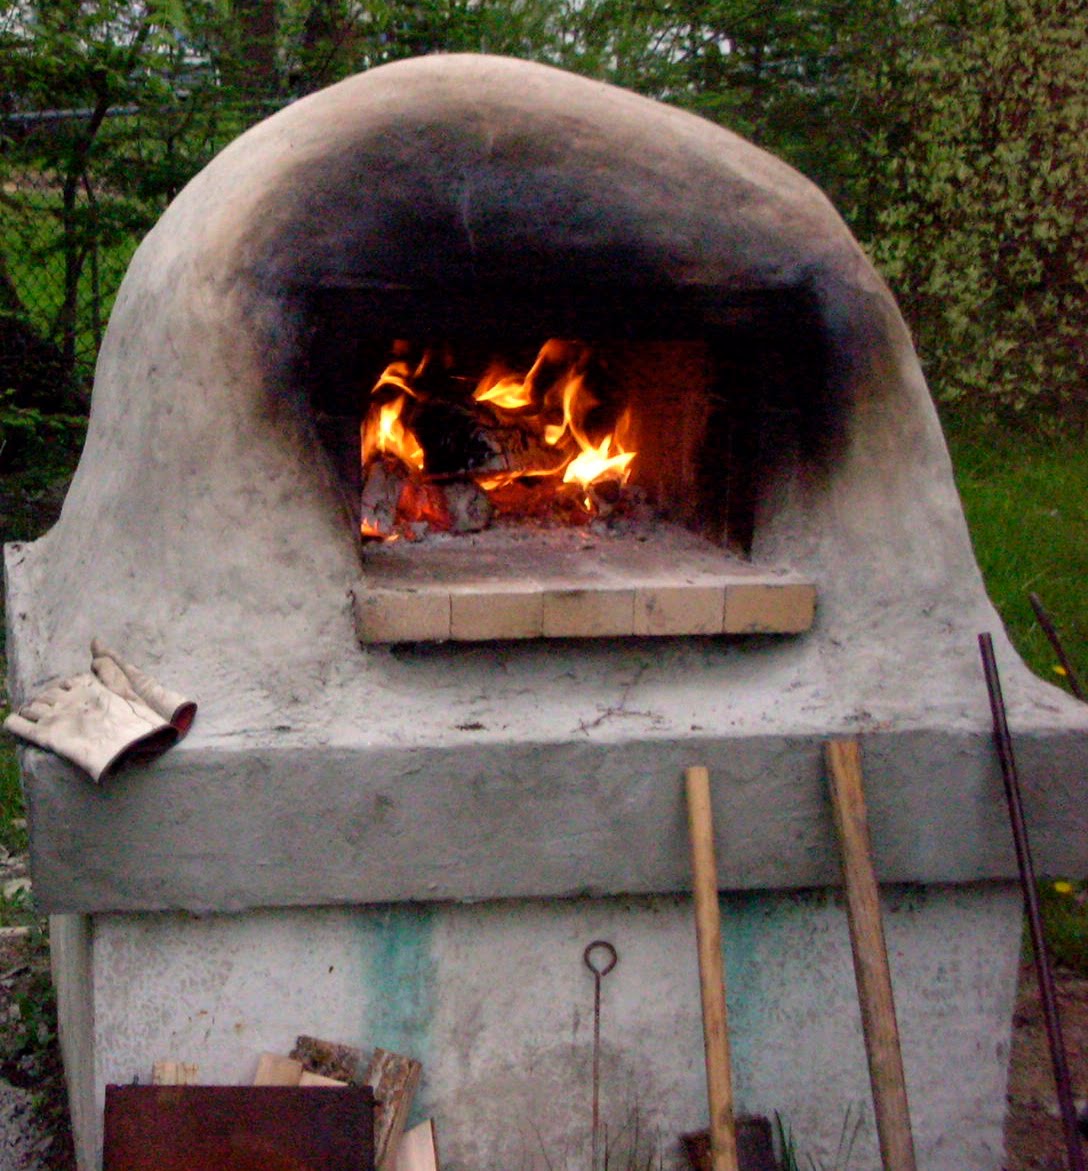
You can let the oven dry for an hour, a day, or you can cut the door opening right away. Abbott and Nancy cut the door opening immediately. Cutting the right size door opening is important because you want the oven to heat up properly, and you’ll also need room to maneuver breads and pizzas around inside the oven.
Many years ago I became fascinated with earth oven construction after reading a book called, “The Bread Ovens of Quebec” by Boily and Blanchette. This is not an easy book to find, but if you come upon it, then buy the book. Just recently, however, the book became available for a free download on the web. Not only is it filled with interesting folklore, but there’s real information on clay oven construction. The authors found that the most successful ovens had door opening dimensions that related to interior oven height. Others have used this formula and I saw no need to reinvent something that has been working for a very long time. Therefore, I use it too, but with some wiggle room. Door height should be 63% of the height of your sand mold, and your mold should be 14 inches high. 0.63 X 14 = 8.82   Generally, the door width is half the diameter of the floor. Your floor diameter is 22 1/2 inches, half of this is 11 1/4 inches.
 I’m going to suggest that you make your door opening just a little bigger, and your oven will still work fine. Go with 9 inches for the height, but make the width 14 inches. You’ll be extending the door opening just slightly beyond the two end tongue bricks, but that shouldn’t matter. The larger door opening will make it much easier to bake pizzas and flat breads. If you adhere rigidly to the Quebec formula, then you might find that you really don’t have as much room as you’d like to have in getting breads and pizzas in and out of the oven. I think the Quebecois were more interested in baking breads than pizzas. 
 With a knife, score the door opening. Cut a little opening first so you can reach into the oven and start scooping out the sand. Enlarge the opening when you can’t reach in far enough.
For the final door opening, angle the cut inward because it will then be easier to fit a door to the opening. Use the inside cut of the door opening when measuring because it will be slightly smaller than the outside measurement. Using your hand, scoop out all the sand. You may or may not be able to feel the newspaper, which is the end of the line. Pull out the newspaper, but if some of it has been trapped by the clay, don’t worry about it. Left over paper will burn out as soon as you fire the oven. A flashlight may also help you to figure out when you’re done scooping sand. Get all the sand out because you don’t want to find it in your bread.
 For making flat breads and pizzas you don’t need a door for your oven because the baking is done with a fire in the oven. To bake raised loaves, however, then you will need a door because the baking process is different, and I will explain this later. Abbott and Nancy found a broken piece of shelf from a kiln to use as, what I hope, will be a temporary door. For my oven, I first found a piece of scrap plywood and I cut it to size. I wrapped the plywood with a wet towel and propped it against the oven opening with a two by four. Not very elegant, but it works, although poorly. Subsequently I constructed a real door, and I am pleased. In the next section I'll go into detail concerning its construction with photos. A door is extremely important for bread baking. You want to contain all that precious heat you've created, and you can only do that with a tight-fitting door. Attempting to contain heat with a flaky door is akin to trying to contain heat in your home in the winter with a window left open.  Get serious about building a real door because without one, your loaves will suffer.
to be continued

Monday, May 24, 2010

from Bread Earth and Fire (The Earth Oven)

 Abbott firms up the mud dome
The Earth Oven con't
Now we’re going to mix mud and totally encase our sand mold with a 4 inch thick layer of mud (clay, sand, water). This job is best to complete all in one work session because you want each successive layer of mud to bond, and it will bond best if it doesn’t dry out while it’s going up. In other words, if you go half way up and stop for a day or two, then the clay will have had some time to dry out, and when you resume the job, you’ll find that it won’t be so easy to get the new clay to bond with the old. Two people mudding up the sand dome should not take more than a couple of hours to finish the job. This assumes of course, multiple dancing feet mixing up the mud.
Making mud involves real work. Use the Tom Sawyer ploy to enlist support, and the more help you have for this stage the better. Grind it all together doing a Chubby Checker  twist routine. Onto a tarp, shovel 2 shovels full of clay and 6 shovels full of sand. We used this 1 to 3 mixture, and it was fine. A 1 part clay to 2 parts sand would also work.
More clay means more oven cracking, although clay creates a better heat sink than sand. Too much sand makes for a weak oven. You have to strike a balance. Clay develops cracks when drying. Generally it’s not life threatening. Most of the clay we used we dug from a little ravine very close to our construction site. A tiny percentage of the clay came from a pottery supply house. Nancy had a little of this clay left over from making pots, and this material was a lot easier to work with than what we dug up. (I recently completed an oven that was done with clay from a pottery supplier, and I don't think I ever want to go back to digging clay. The processed clay was amazingly easy to work with). What you need to do is totally incorporate the clay with the sand. Add only a little water at a time, and get your feet into the stuff. Some work it barefoot, and some leave their shoes on. I prefer to leave my shoes on because then I then don’t need to worry about injuring my feet. If you at all suspect something alien like glass or nails in the materials, then definitely leave your shoes on. You can hose them off later.A wet mixture is much easier to create and work with, but don’t be tempted, or your earth oven will sag and bulge out as you build it up. I have made this fatal mistake, and all I could do was remove the offending material and start again. Fortunately my sand mold was spared.

Forming the  dome with mud
I have also had the heinous experience of having an oven collapse during a workshop I was leading. The problem was too much sand and not enough clay. Much to my relief, in one hour we rebuilt the sand mold, applied the mud (with the correct proportions of clay to sand) and two hours later we were making pizza.
Strive for a 4 inch thick layer of mud, pack it tightly, but don’t force it against the sand dome because you could damage it. Your mud dome should not touch the stone foundation because you don’t want to transfer heat to an unnecessary place. Start at the bottom and work your way around the sand dome going higher and higher, and as you do so, angle the mud slightly so it comes together evenly at the top. Maintain a 4” thickness all the way, but if in some places it’s 5 inches, then no big deal. But try not to go less than 4 inches because you need the mass for the oven to work properly. 
Take a length of two by four and use it to finish shaping the oven. It’s okay to bang the oven with the board as this will help compact the clay. If you see imperfections in the clay dome, and you will, don’t worry about it because the clay dome will be totally encased with insulation, and you’ll never notice. to be con't.

Sunday, May 23, 2010

from Bread Earth and Fire

The Earth Oven con't.
note: lots of details have been left out of these blog posts, but are including in the book.

NOW IT’S TIME TO START BUILDING THE OVEN
Oven floor
Lay out your brick floor with the tongue bricks as shown in the photos. Your tongue bricks should be a couple of inches higher than the rock base. Get the firebricks exactly where you want them because you won’t be able to move them later. We’ll add some more rocks to our base later on to bring the base to a height slightly lower than the top of your firebrick tongue. You might have to fiddle with the rocks a little bit to achieve this since the rocks are definitely not uniform, but we’re not really striving for scientific exactitude. I’ve used other brick floor configurations, but this configuration works well. Examine all the bricks carefully. You want the smoothest side up, and when you place the bricks, have them all nice and snug next to each other. Avoid gaps between the bricks and have all the bricks on the same plane with no little steps between them.
You might have to place a little sand under some of the bricks to accomplish this. Tap them gently. Your best bricks should be reserved for the center of the floor because it is here where you’ll be doing most of the baking. This is important because you’ll be scooping under your breads and pizzas with a steel peel (paddle) to take them from the oven and you don’t want to be catching on a jagged brick floor.

It is the sand dome that will define the shape of your oven, and it’s time to build it, but first fill the area between the slab and rock base with your perlite mixture. Now draw a 22 1/2 inch diameter circle on the brick oven floor, extending just slightly onto the tongue bricks. 
 Abbott begins to form the sand dome
Use damp sand, and pat it with your hands to get the desired shape and height. Extend the sand form right to the edge of your drawn circle. If you don’t finish it all at once, then cover the sand form with plastic to protect it from rain or from drying out.
Make the top of the dome height 14 inches. This is the height I’ve worked with, and it’s great for pizzas and breads. Very much higher or lower will change the dynamics of the baking characteristics of the oven so I’ll only stand by what has worked for us. 16 inches is also a common oven height.
After the sand dome is built, you can tamp it with a board to help compress and shape the sand. Now cover the sand dome with a couple of layers of wet newspapers. The newspaper is helpful because when it’s time to scoop out the sand with your hands, you will be able to feel the newspaper and know that this is where the sand ends and the earth begins. I have to admit that once I forgot to layer the dome with newspaper, and it didn’t make any difference. I could easily feel the interior earth wall while scooping out the sand. Anyway, Abbott and Nancy used the newspaper and it provides at least, a psychological layer of security. to be con't